I wanted to try pinhole photography for years. At last, I gave it a go!
For the camera body, I used a cylindrical tin can. I drilled the body and taped the pinhole I’ve made using a beverage can. This is the most straightforward approach in pinhole camera making. I’ve used mrpinhole’s calculator as a starting point. After getting the camera ready, instead of using film, I went with a paper negative.
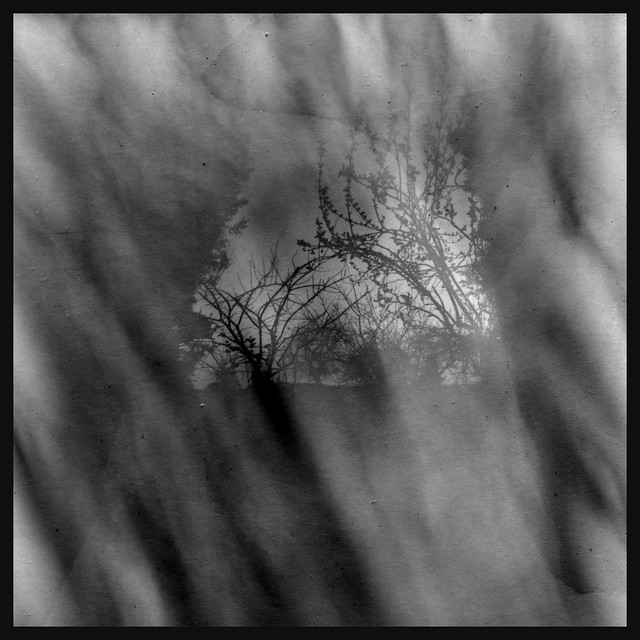
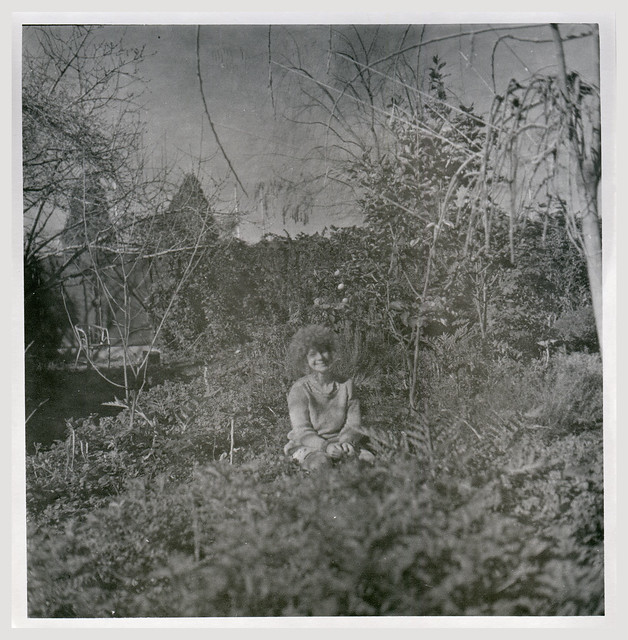
Pinhole photography is a simple concept but making an ideal pinhole camera is absurdly tricky. I spent a long time holding a tiny pin to make the perfect hole before changing my approach. The camera had to be tested at one point so I moved that point towards me and went for an early test shoot. My “negative” is at least 30 years old. To be safe, I rated it at 3 ASA. The pinhole is around f:302 and the exposure time was 2 min. I developed the negative in home made Rodinal (1+20)
“Veiled” / First Pinhole Shot @ f:302/2min // 13×17 FB Paper Negative, Dev in Home Made Rodinal (1+20) Scanned in Dusty Epson V33, Cropped in PS
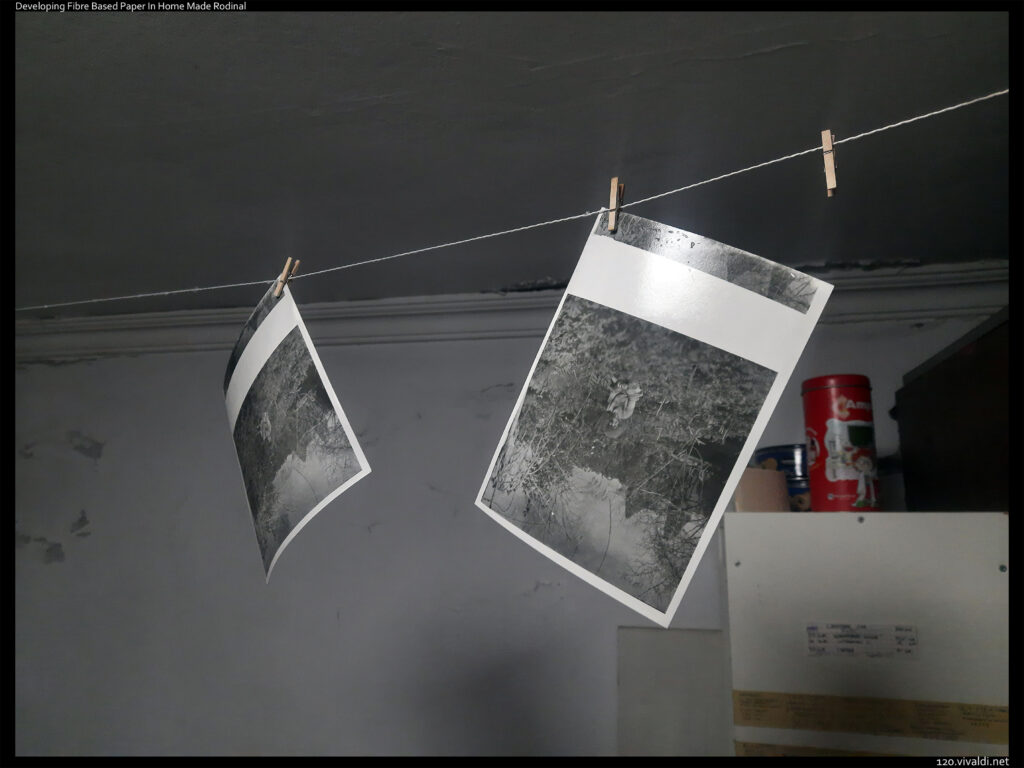
It looks like the tin can needs some light-proofing. Before the next shoot, I will paint the inner surfaces in black and wrap some electrical tape around the upper rim.
After developing and scanning the photo, I kept prodding the tiny pin through aluminium to make the pinhole bigger. The ideal pinhole size is 0.377mm for my use and I’ve managed to get close (0.3634 mm) . I don’t think I’m going to push my luck any further…
For pinhole measurement, I used my ancient scanner. Martin Winfield’s wonderful page had everything I needed to learn the technique. This step requires patience as it takes a lot of trial and error.
If I manage to properly expose my next photo, I’d like to try making a positive by contact printing the paper negative.
Well the contraption has a name. I call it “Shoebox Scanner Mark VI” . It’s not really a scanner, it’s more of a scanning rig. It doesn’t contain a shoebox either (But the Mark I had one). It’s something that I’ve came up with about a year ago, using solely discarded/found materials. As I used it, I kept making changes. In the end, it became a reliable and indispensable tool. I’m planning to make a simple tutorial for “Shoebox Scanner Making” and share it here.
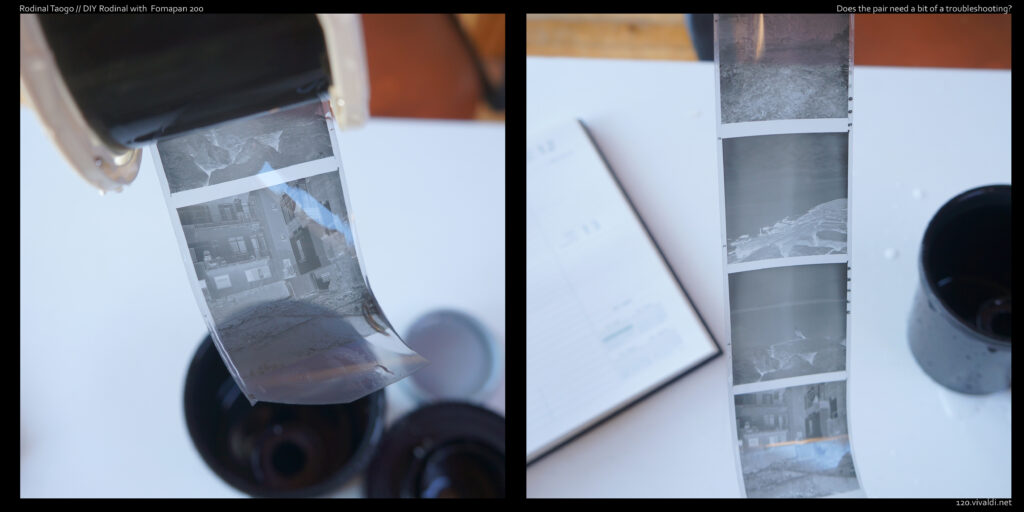
For now, here are some scans from the latest roll ( troublesome Foma 200), developed in Home Made Rodinal. All scanned with “Shoebox Scanner Mark IV”. Conversion, spotting and editing were done in Lightroom Classic. Plenty of other, older scan samples are available in my Flickr account.
I learned a few things today. These are little additions to my previous notes. They hardly qualify as discoveries but they will surely nudge me in the right direction and make things a little bit easier in the future.
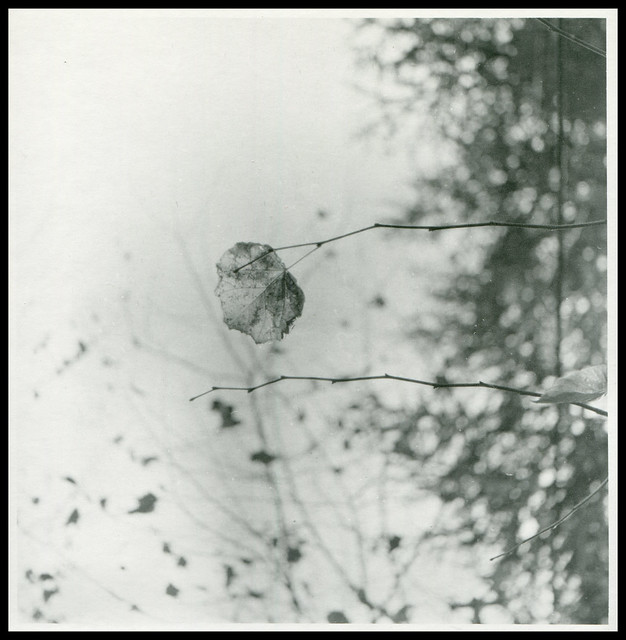
My third darkroom session with HM Rodinal was a short one. I’ve had some printing ideas I’d like to try but I knew that the box of papers was nearly empty, so I settled for the objective of reprinting the photo of a leaf (which I shared earlier). I also tested a more diluted solution (1+30) in a colder/unheated darkroom setting. The papers that were left in the bottom of the box were fogged, the solution was too diluted and/or the working temperature was not really suitable. In short, this session did not yield a proper print. But, it taught me that using (1+20) Rodinal dilution in (at least) 15°C temperature is the minimum requirement that I should meet.
The fibre based photo papers that I use are from an unknown date. When I bought them online, I did a little research but I couldn’t find any meaningful info about “Foma Neobrom N1111”. I wanted to spend less time in front of a screen and more time in the dark room that I just finished working on, so I went ahead and started using the papers, experimenting and noting the results of my trial and error process. Today, I finished the first box of Neobrom.
A while back, when I first opened the box, I wasn’t sure how dark my darkroom was. I did my best to lightproof every surface and I spent time in total darkness (which funnily hurt my eyes) but uncertainty remained. To be safe, I decided to open the box in complete darkness. As I fumbled in the dark, I tore some unidentified layers within the crumbling cardboard box. When I got out a single paper, I wasn’t sure if everything was alright. I managed to find my gaffer’s tape in the dark and I “fixed” the box as best as I could. That was my first day in the darkroom. It was a long day.
I used the papers for about six months and I rarely had a problem with fogging. As I keep picking papers from the middle of the box, the papers in each sides were the last ones. These were pretty foggy. So… no proper prints today.
Despite all that, the day wasn’t a complete loss.
After opening the empty box and peeling the crumbling inner layers of paper and tinfoil, I’ve found a sheet of instructions, printed on cheap, yellow paper. It provides general directions and a recipe to make paper developer. At that point, I realized that these papers were much older than I imagined. The recipe is pretty straightforward and it follows tried and tested ingredients, which are a bit hard to find online.
If you have any experience with these papers, please let me know. I’m curious!
A found recipe, an imposing f and a cool yellow.
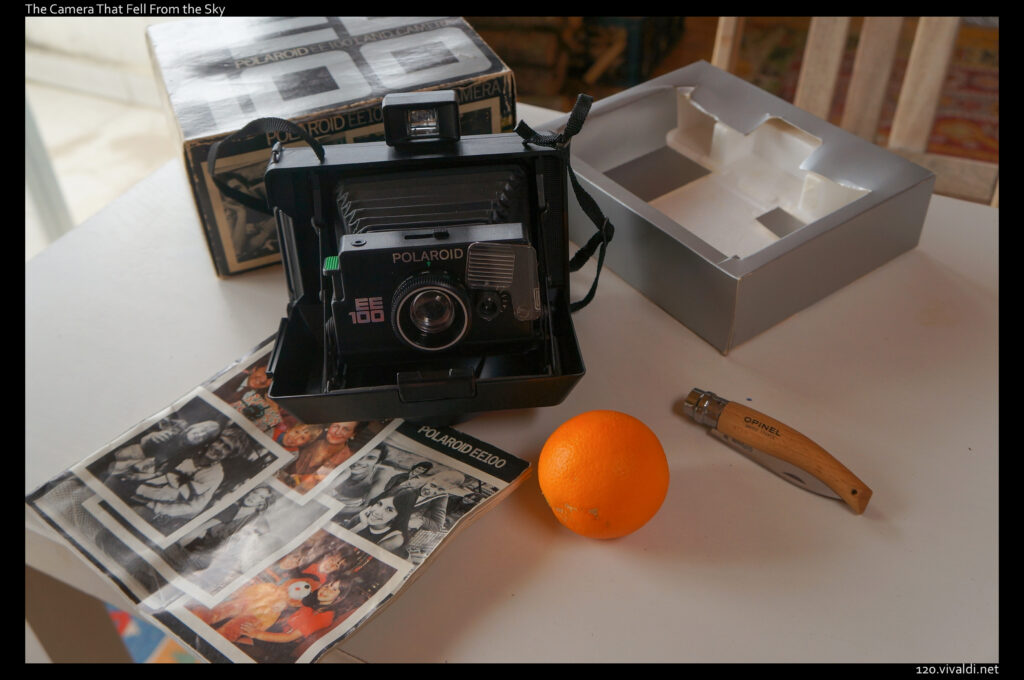
The last update is about the camera that fell from the sky. It works! In fact, it works much better than I expected. It turns out that the camera has shutter speed control. The tiny knob which regulates “the lightness/darkness” of the photos (as explained in the manual) works as a click-less shutter speed selector, paired with the “electric eye” (the EE in the model name, basically a light meter) . To keep the shutter open, all you have to do is to cover the electric eye. In other words, when the electric eye is covered, bulb mode kicks in. There’s even a shutter cable socket. There are two apertures. The mechanism works beautifully with two common AA batteries. In theory, I can load pre-cut paper negatives, put the camera on a tripod and more or less use the camera as any other. The only bad news is that there’s fungus right in middle of the lens. If everything else works, I think I’d be able to find a way to clean the lens (fingers crossed.)
A single leaf, clinging to life in the midst of construction craze.
Here’s the first print of a shot that I liked. The exposure was much shorter than I used with previous negs developed in Caffenol. My test prints had a much broader range than I needed (around 10 to 20 seconds increments) and that also threw me off a little.
In my second session, I used a slightly weaker Rodinal dilution (1+22), which worked surprisingly well, considering that I made seven prints during a three hours long session. Rodinal loses it’s potency in an open tray but development times can be easily arranged with an increase of 30 to 50 seconds per print, depending on the density. I have still much to learn but I have a few ideas to get a cleaner, more defined print in my next session.
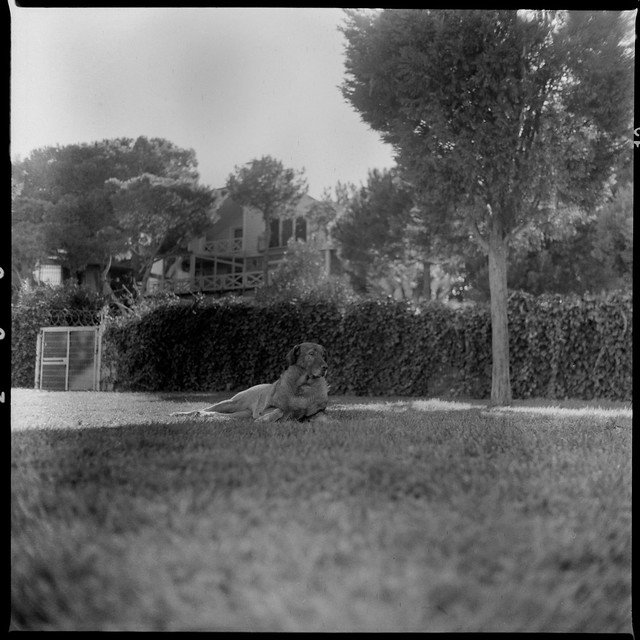
Fomapan 200 Shot with YashicaMat 124G Developed in Rodinal (1+50) 9 min Printed on ancient Fomabrom FB paper (13×18) using Meopta Magnifax with Meopta Belar@f:8 Paper developed in Rodinal (1+22) Scanned with a dusty Epson V33 Cropped/Exported in PS
I always loved second hand markets and yard sales. When I was little, I used to visit a huge weekly market, marvelling at strange objects and shifty sellers for hours. Time moved on and generations switched places. Now, open air markets are more or less gone where I live. The thrill of finding a hidden gem within a mountain of U.P.O ( Unidentified Piling Objects) is not really comparable to searching for old objects in E-Bay or it’s clones.
In the past I had the chance to find, use, repair, trade and enjoy dozens of (around sixty) film cameras when people did not give two bits about old photography gear. But times change. Fads appear and disappear much more aggressively in the social media age. People “learn” things by reading a few lines, turn tools ( e.g mediocre auto everything film compacts) into fetish objects or get hung up on the representation of things more than their actual function. Yes times are changing and I become more and more grumpy! I still yearn for the thrill of finding gems in unexpected places but I almost gave up looking for rare items online. I don’t really have the funds and I rarely have a practical use for such items. For impractical uses, I prefer DIY items or found objects. Like the camera which fell from the sky today!
Today, I was helping my better half in gathering mulch for the garden. A tiny garden with pine trees is the spot where we visit for this task. There’s a big communal trash container just at the entrance of the garden. There was nothing interesting about it. We went in and filled a giant sack with pine needles . When I got out, I saw it, sitting on the top of the container. A box of Polaroid Land camera in very good condition. Inside, sitting an-almost-never-used Polaroid Land Camera EE 100 with it’s original manual. The thrill of finding something unexpected came back…unexpectedly! The camera had even original (un-leaked) batteries inside.
I knew that one has to be very creative to find a use for a Polaroid camera, since -as a medium- Polaroid film is almost extinct. The few available options are not compatible with my newly found camera (or my wallet). But I was happy! A mysterious (yet mundane) stroke of luck meant that I’ve had to find a deserving project to thank the Lady Luck.
I’m thinking about trying to use paper negatives in Polaroid. It would be a nice project to shoot paper negs and to print those on “positives” in the darkroom.
I always wanted to come across a film camera while walking in the street. Truly, I did. What a nice day!
Here’s the first print that I’ve developed in Rodinal, after a long dark room break.
I like this photo even if it’s out of focus. It anchors a specific moment beautifully and I can feel the sunshine, just looking at it. Probably that’s the reason I started printing with this shot.
Fomapan 200 Shot with YashicaMat 124G Developed in Rodinal (1+50) 9 min Printed on ancient Fomabrom FB paper (13×18) Developed in Rodinal (1+20) Scanned with a dusty Epson V33
I printed my first photos with home-made Rodinal and the formula works! The initial run helped me to test some basic characteristics and to get in the groove after a long dark room break.
I kept some notes while printing and I’ll try to put these in a cohesive post below. With this initial session, I barely scratched the surface of what’s possible and I’m eager to make more prints to test Rodinal in greater detail.
first prints in home made Rodinal.
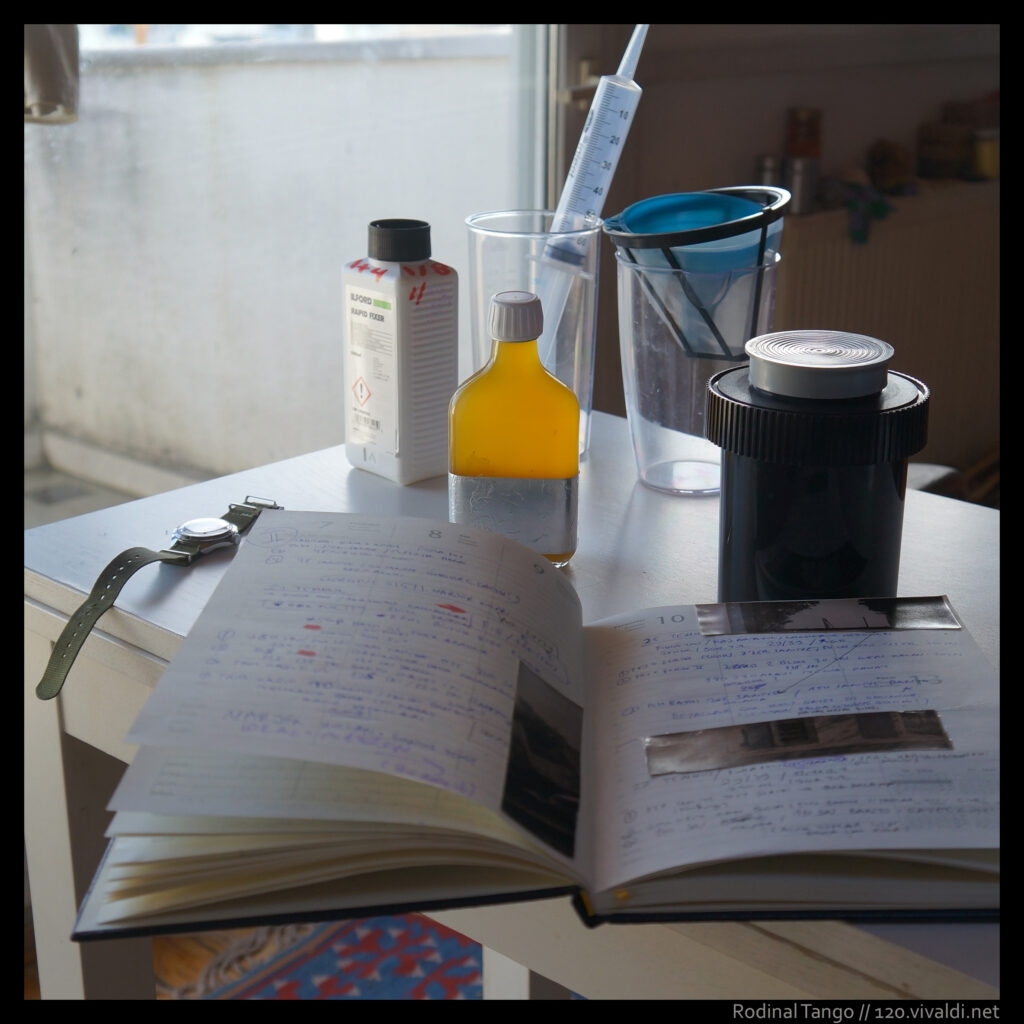
I prepared a 250ml solution with 1+20 dilution. In practical terms it means that I’ve added 13ml of Rodinal in a quarter litre of purified water.
Rodinal can be used in many different dilution schemes. I needed to figure out the dilution for developing paper. Popularly, the maximum amount of Rodinal dilution for film developing is 1+25. As a rule, a photo paper is rich in silver content (or richer than a film) so the developer has to be strong to work it’s magic to the completion. It’s also good to keep in mind that the developer can lose it’s potency while sitting in an open tray. (That’s especially true with home made developers). I’ve noted a few figures that I came across in forums and I thought 1+20 was a nice starting point. Not too strong, not too diluted. This proved to be an OK choice.
250 ml is the the usual amount that I prepare for three to four prints (13×18 cm), excluding the test strips. As I previously used Caffenol as my main developer, preparing a small amount of solution helped me to minimize the opacity of thick, brown working “soup”. Even though Rodinal solution was crystal clear, I stuck with the same amount out of habit. Now I think that working with more solution can be a bit more comfortable.
Extreme temperatures can be tricky in film photography and my darkroom is the coldest place in the house. So I tried to heat it with an electric heater. As a working temperature, 20°C is the golden standard. All the technical sheets and the practical guides that I’ve read established development times around this magical figure. Unfortunately the electrical heater had it’s limits and I’ve had to make do with a working temperature ranging from 15°C to 10°C. It worked well. If you’re like me, unable to find info about the working temperature limits of Rodinal in dark room, don’t worry. Rodinal works in less than ideal conditions. At least my home made version did.
I use old fibre based photo papers. While I don’t have the slightest idea about my papers’ production date, after a long research I’ve managed to find that they’ve been discontinued in 2008. They’re at least 16 years old but that doesn’t make them obsolete. They work, albeit a bit slowly. They’re fibre based, subtly textured, thickish papers with pearl finish. I like them very much but I realized that I wasn’t showing them the proper respect they deserved. I never used a hypo clear solution with my papers before. That’s the solution which helps negating fixer’s harmful effects on the fibre paper. It also helps reducing the water amount one has to use for final wash. Since fibre based paper soaks up chemicals more hungrily than RC paper does, clearing the paper from heavy fixer residue, gives a better chance to create long lasting prints.
To amend my past mistakes and to start making long lasting prints, I’ve added a teaspoon and a half sodium sulfite in 250ml of purified water.That wasn’t so hard after all! So, apart from testing Rodinal, I was also debuting my home-made hypo clear solution in this session.
I also fine tuned the amount of white vinegar I use for the stop bath. Previously I was going crazy with the white vinegar. A shameful 1:1 water-vinegar ratio was not unheard of in my dark room. As I stopped and read a little, I realized %2 addition was the norm. Now, I’m happy to start adding a cap full of white vinegar in a quarter of litre of water. This is the stop bath I used and it worked perfectly.
I use 1+4 dilution for my fixer. It’s filtered after each session and it’s reused. If I have to take break while printing, I filter the fixer and I bottle it up. It’s hard to spoil fixer as long as one is careful. I also mark the fixer bottle with a red marker to keep track of my usage.
Rodinal (1+20), 250ml ->Stop bath 250ml.(%2 white vinegar) ->Fixer 500ml.(1+4) ->Hypo Clear (Sodium Sulfite, around five grams)->Fresh Water (2 litres) -> Final wash (15 to 20 minutes)
I’m far from getting a handle on this paper-dev combination but the results are very promising. An erratic metronome (I use a metronome instead of a timer, more on that later…) made things harder and I controlled exposure by counting. Since my antiquated papers require lot’s of exposure, my usual range starts from a minute, so I’m not that finicky about exposure. Still, it would be best to learn how to service my metronome to keep some degree of dignity in my darkroom.
Well, that’s about it. Earlier I wrote that I’m looking forward to share contact prints but I changed my mind. I think I’ll be making prints sooner that I initially planned, so sharing scans of new prints would be a nice motivation for me.
Film photography can be awesome. It can also be frustrating. Usually it vacillates between the two states. Old-school dark room dwellers find a way that works and they stick with it. A single developer, a single film type, a single processing scheme. No fuss, no headaches. If it works, don’t touch it! There’s no reason to try to understand every tiny detail in dark room magic. That’s a tempting way to follow. It was also my way of doing things for the last year.
I’ve been happily using Caffenol as my developer. If you haven’t heard about it before, it’s an interesting choice for multiple reasons. It’s a mixture of washing soda, Vitamin C and instant coffee in varying amounts for different films. (I’m planning to make a separate post about Caffenol somewhere along the way.)
While I was happily experimenting with Caffenol, I kept coming across photos that were developed in Rodinal so I’ve read about it. There are Rodinal lovers everywhere! It’s an old old formula, which is still produced by different companies with slight variations. It can be reproduced/adapted using Paracetamol (painkillers), sodium sulfite and sodium hydroxide (drain cleaner). That’s one of the more straightforward Rodinal recipe and the one that I’ve decided to use, after reading tons of threads.
The recipe I used was originally posted by Jaco in photrio.com forums. (I’d like to include the original link, if I ever find it!)
Water: 100 ml Sodium sulfite: 40 g Dissolve at roughly 50 degC (122 degF)
Water: 60 ml Potassium hydroxide: 17.9 g Dissolve the hydroxide, then add 15 g (30 capsules) of paracetamol while the hydroxide solution is still hot. Stir in the powder thoroughly and break any clots. It will turn reddish and murky, which is fine.
Once the two parts are cool, combine. Use the sulfite solution to wash out all the paracetamol solution. Make the final volume up to 200 ml (not 250!). Any undissolved sulfite can be added as crystals to the final container – it will dissolve over time.
After following the recipe, I ended up with a murky, almost soapy solution in brown. It looked like a small disaster. After a few days, my patience became thinner and during the day, I started to shake the bottle whenever I felt like it. I also put it near the woodstove in the evenings. That move seemed to help in breaking the clots. At the end of a week, I ended up with a clear solution.
After dabbing a thin plastic tube in the solution and moving a tiny drop on a freshly cut film leader, I witnessed the film turning to black within a moment. Rodinal was ready to use!
The film I shot and loaded in the tank was Fomapan 200. An interesting film which both have classic and tubular grain within it’s emulsion. For me, it’s the cleanest and sharpest film in Foma line. It’s also a bit fickle, less accepting than Fomapan 100 or Fomapan 400. Today, after going back and forth about which dilution and developing scheme to use, I decided to play it safely. I followed Foma’s own tech sheet which you can find here .
Development took 9 minutes in 20°C. I agitated constantly for the first minute than I switched to 5 seconds long gentle agitations in each 30 seconds for the remainder of dev time. I go by 8 shaped agitations on a level surface. Agitation is a very personal thing. Like everything else in film photography. I’m an eight-shaped-agitations guy.
The results looked promising, apart from a slight issue. There’s a light coloured banding in the middle of the roll. It’s predominantly present in the middle frames of the roll. I came across this problem before but I thought that it was linked with Caffenol (washing soda) specific problems or with using expired film.
My aim is to print these negatives and for that use the density looks fine. I really like the overall contrast and sharpness and I hope to make decent prints despite the slight issue.
I’m going to make some research about the issue and try to think a way to warm my freezing darkroom for a printing session.
Hopefully my next post will have the scans of contact prints.