
My last session was a long one. There were many tests waiting to be conducted. I was eager to learn more about the limits of my photo papers when used as paper negatives. I wanted to see what happens when I use a smaller paper negative in my tin can pinhole camera. I was curious about the difference between in Caffenol and home made Rodinal in less than ideal working conditions (in winter mode). I was anxious to try using my found Polaroid Land camera (which you can read about, scrolling further down). Would paper negatives be a breath of fresh air for that obsolete toy? I also wanted to give contact printing paper positives a second chance, in dry form this time (again, for the wet tests, you can scroll further down.)
And I managed to try all these things with mixed success and great fun. I basically spent the whole day shooting and printing. It was a cold and dark day but also a fruitful one. It taught me a lot.

Paper neg had a rough time during development. Things were too experimental…
Caffenol (adapted CH) + home made Rodinal (1+20)
scanned with a dusty Epson V33 @2000 dpi
conversion, cropping, spotting, framing, compression in PS
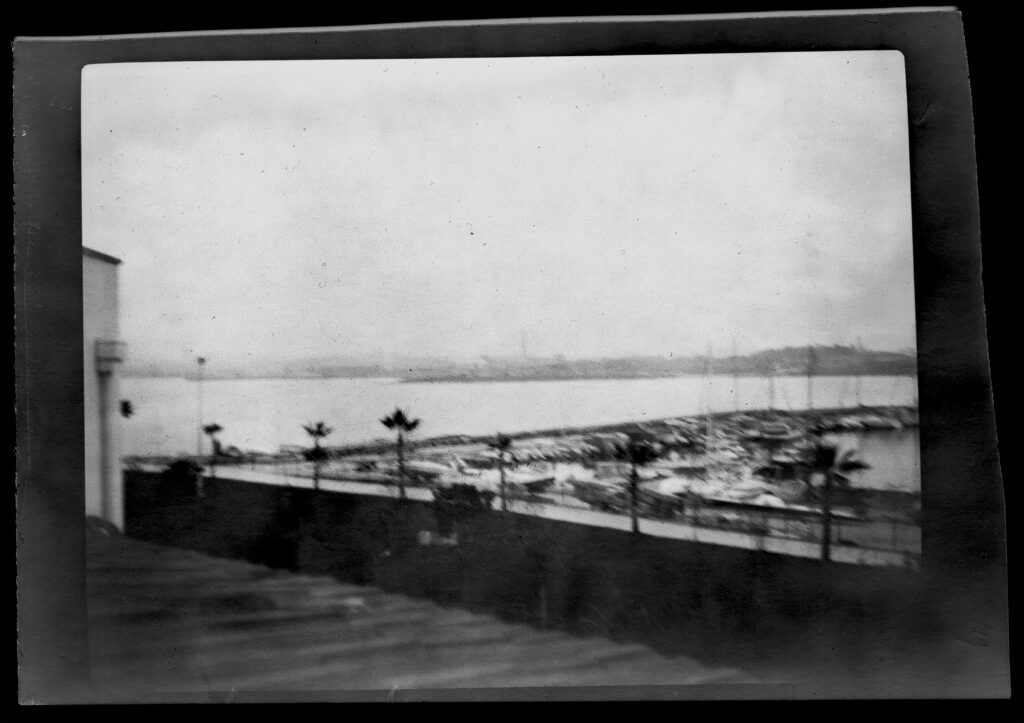
First, the pinhole result. The neg is smaller than half a paper. It’s also placed horizontally. This is my first long exposure and I like the result. There were plenty of problems during the development so I’ve ended up cramming the paper in the tiny container that I’ve filled with home made Rodinal. My original idea was to test Caffenol as a paper neg developer, thinking that it’s gentler characteristics would balance the strong contrast of my photo papers. Nope. I was way off. Caffenol did not work at all. I’ve developed dozens of photos with Caffenol. I have my own adapted formula which works well (in optimal temperature) and I like Caffenol’s staining. I guess winter conditions were not up to Caffenol’s taste. In the end, I started developing a few shots in Caffenol, later to switch to Rodinal. Post Caffenol, Rodinal worked mightily and very quickly. I think Caffenol worked at some level, since Rodinal’s effect was much more abrupt than I usually get developing prints. I don’t know if mixing two home made developers worked. I don’t know how if they did. For now, I decided to use Rodinal in the winter and go with Caffenol in summer time. I’m also thinking about using Rodinal for prints and stick to Caffenol for film. Since it’s easier/faster to control film tank’s temperature, getting consistent results with Caffenol wouldn’t be a problem.
I liked the photo above and I think I’ll keep cutting paper negs in smaller, horizontal pieces. This can make the shooting experience more agreeable for me as I never cared much for vertical framing. This would also be a less costly way.
I’ve shot three test photos with Polaroid Land Camera. There were a few hiccups in the beginning. I wasn’t able to solve these issues but I went with the plan anyway. First of all, the camera has a funky tripod hole. It’s standard sized but it’s somehow shallow. The camera’s foldable case/cover also prevents a firm fit. Another issue was that I had no shutter cable. Well, I had one but apparently, it vanished in the sea of time. Along with affordable films and obscure cameras that nobody else cares…End of the ramble. Moving on. The third issue was the weather. The moment I started cutting papers and preparing solutions was apparently the moment weather decided to turn. When I had the camera ready, the weather was simply rotten. In the end, all these yapping means one simple thing: blurry, underexposed photos. Nevertheless, photos that work as a proof of concept. It is possible to use paper negatives in a Polaroid Land Camera. The process is relatively hassle free but the execution requires refinement…mucho refinement.
And now here’s something a bit wilder:

This one had it’s fair share in a spent developer. At that point I was in the darkroom for hours and with no heating both the temperature of the solution and the room went down. The light was waning and the whole mess resulted in this shot. It’s very dramatic and it has it’s own eerie charm. I think this one was a win for the day!
So about the Polaroid Land Camera. Was everything bad? Not at all! I tested the camera , blocking the electric eye with a piece of electrical tap. For good measure, I blocked it further with my finger. The camera is uncomfortable to hold and combined with my weird grip, depressing the heavy shutter was a bit of a chore but, and that’s a big but, keeping the shutter depressed while keeping the electric eye covered meant that I’ve had a Bulb mode. There’s a cable shutter slot above the shutter and pressing the cable shutter and locking it would mean a breezy experience in pseudo-bulb mode. Given that the tripod socket is secured and that’s a whole another story. But, I’m sure I’ll get there. I still don’t know if the lens is worthy of use though. It has a funky shaped monster fungus right in the middle. I’ll know once I rule out the camera shake.
What else? Contact printing paper negatives, yes. Before the session, I’ve prepared a nice little setup to contact print paper negatives. I read different accounts about the exposure intensity and light source position. Earlier, I’ve had limited success with my enlarger’s light bulb, removing the film carrier and the lens. This time, I wanted to test a halogen light source that I’ve found in the storage room. It had a nice, adjustable base which I secured on top of my working desk, using double sided tape strips on the long shelf over my enlarger. I taped a thick piece of synthetic foam and thoroughly cleaned a glass panel. I was fairly happy with the preparations and when the time to contact print dry negatives came, the halogen bulb got busted. I carried the neg.-pos.-glass sandwich under the enlarger and my metronome run out of juice (it’s wound up). My audio player stopped working while I was counting seconds and things went on in this fashion. There were many mishaps, hiccups, cock-ups with the contact printing step. In short, it didn’t work well. But, in the faint prints, I can see that with stronger exposure and a fresher developer, it’s possible to get good results. Wet contact prints came with weird water spots/blotches and dry ones were free of those. At one point, I’ll return to dry tests using a new bulb/lamp.
I’m thinking about making another, smaller pinhole camera. I’ve also been reading about reversal methods for paper negatives. If I manage to pull that off, I can bypass contact printing for having unique, no lens paper positives. I really like the idea. There are 120 negs that I want to print. So yeah, many things to try. I wonder what will be next post…
Until next time,
Take care.
120