
I was anxious to try my pinhole camera a second time. The day before shooting, I painted the camera body (i.e tin can) in black, using a cheap spray paint . Before shooting, I fastened the slightly improved (f:220) pinhole on the jet-black tin can, using a healthy amount of duct tape. The camera ended up too black. So I added a tiny strip of white tape on the shutter ( a piece of electrical tape, covering the pinhole) to be able to see what I’m doing. Under the red light, I took a photo paper, cut it slightly to fit the tin can’s (ahem! camera’s) height and went outside.
My aim was to come up with some kind of starting point for the exposure. Determining the speed of paper negatives is tricky at best. Determining the speed of ancient paper negatives, produced before the fall of Czechoslovakia is a whole another thing. I’ve read that, freshly produced modern photo papers are rated at 6 to 12 ASA. I went with 2 ASA. Feeding the pinhole calculator from mrpinhole’s site with 2 ASA and guesstimating that the weather (foggy with soft edged shadows) required a bit more exposure, I’ve chosen 3 minutes as the starting point. It was a bit short and I accidently moved the camera during exposure. Regardless, I was able to see some tone separation in the paper negative, after developing it in Rodinal (1+20). I also realized that painting the can eliminated flaring problem. I was excited for the second run.
For the next shot, I moved the camera somewhere more blue . As the photo papers are more sensitive to blue light, I decided to compose the shot with blue elements. The sky and the blue mosaics of a swimming pool. These were the blue things I had at the moment. As the last negative was a bit under-exposed, I decided to expose the shot for 7 minutes. It was a good guess and second shot was much better.
In the darkroom I realized that the paper negative was smudged by black spray paint. The spray paint I used wasn’t the best one and it turned out the paint did not dry properly after 24 hours. The paper was marked but it showed beautiful dynamic range. I was able to see good blacks and some healthy whites under the red light. I developed the paper, judging the time by eye. After inspecting it under the normal light, I became anxious to try printing positive of the shot. If I did that, the result would be a completely lens free photo, from shot to positive print.
My idea was to contact print the negative. The process is more or less the same with contact printing negative films with a small caveat. Since the emulsion sides of two photo papers has to contact each other closely, contact printing positives was traditionally done wet. The process is as follows: The paper negative is developed. The blank/unexposed paper to be used as positive print is submerged in water, next to paper negative. The papers are stuck together, emulsion side to emulsion side. The excess water is drained/squegeed. Paper sandwiched is placed on a softish surface , a heavy glass is placed on top of the sandwich. Papers are exposed under naked light. Positive print is peeled off and developed as usual.
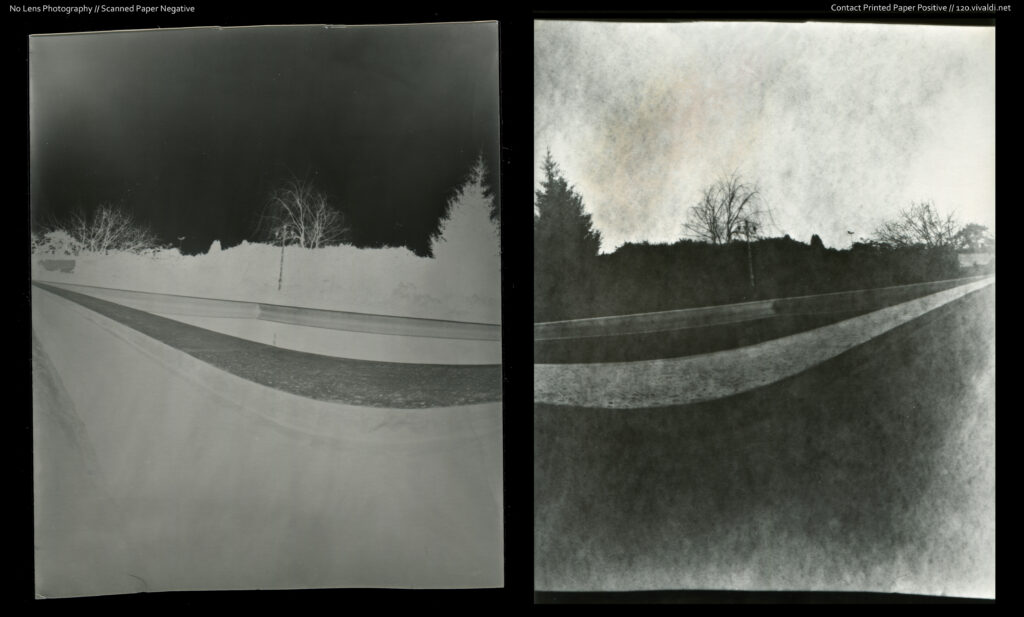
I was anxious to try this process. Usually I learn things with baby steps. This time, I felt that I had luck and I went straight ahead to print a positive image. I had no idea about the exposure time I needed for contact printing paper. Paper is not transparent. I use fibre based papers which are fairly thick. The papers are old and they require lot’s of light in normal use. Normally careful testing would be the sane thing to do. But I played by the ear and went with 100 seconds as the exposure time.
Before exposure, I cut the soiled part of the paper neg, getting rid of the spray paint. The negative and the positive was stuck effortlessly. I did not try to squegee the papers. It felt somewhat tricky and my expectations wasn’t high. I just wanted to see a result. I removed the lens and the film carrier so my enlarger became a big lamp for this shot.
I developed the positive image as usual in my home made Rodinal (1+20). I was happy to see the positive image. It turned out that the water that was trapped between glass panel and the papers had it’s effect on the print. Some parts of the image were doubled, like the results of a camera shake. The print looked like it needed a bit more exposure but all in all, it was a great finale for the day. I exposed and printed my first no-lens, no-film shot.

More to come.
Take care,
120